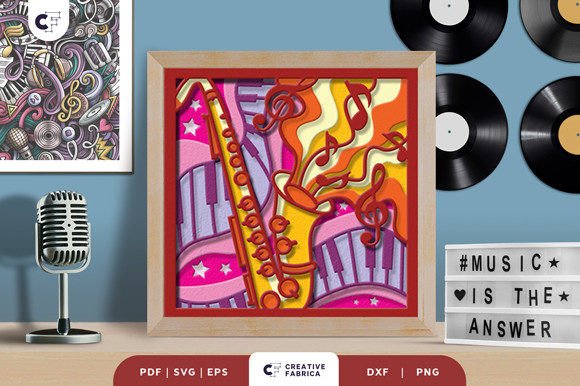
Creating a Saxophone 3D Shadow Box Paper Cut: A Detailed Guide to SVG Templates and Crafting
For crafters of all skill levels, the world of paper cutting offers an exciting blend of creativity and precision. One particularly captivating design is the Saxophone 3D Shadow Box Paper Cut SVG. This intricate template allows you to transform simple cardstock into a stunning three-dimensional piece of art that can be used as wall decor or even a light box. In this article, we’ll explore what this template entails, how it works, and why it’s such a popular choice among hobbyists and professionals alike.
What Is a 3D Shadow Box Paper Cut?
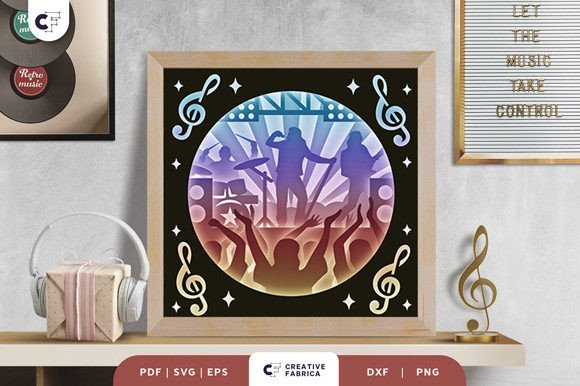
A 3D shadow box paper cut is a layered paper sculpture that creates the illusion of depth through strategic layering and lighting. Unlike traditional paper cuts that are flat and linear, these designs use multiple layers to form shapes that appear to float within the box. The result is a visually striking artwork that showcases the beauty of paper in ways that feel almost magical.
The saxophone design specifically features nine layers, each contributing to the overall shape and detail of the instrument. When assembled correctly, the layers interact with light to cast subtle shadows, enhancing the sense of realism and dimensionality.
Understanding the Template Formats
To make crafting accessible and versatile, the Saxophone 3D Shadow Box comes in several digital formats:
- SVG (Scalable Vector Graphics): Ideal for use with digital cutting machines like Silhouette and Cricut. This format ensures crisp lines and accurate dimensions when resized.
- PDF: Great for printing and hand-cutting. You can trace the design onto your cardstock using a light table or window for precision.
- EPS (Encapsulated PostScript): A professional vector format suitable for editing in software like Adobe Illustrator.
- PNG: Provides a transparent background image for visual reference or manual cutting.
- DXF: Compatible with laser cutters and other industrial tools, offering precise geometry for large-scale projects.
Each file format serves a different purpose depending on your tools and preferences. Whether you're using high-tech machinery or just a pair of scissors and a ruler, there's an option tailored for you.
Tools You'll Need
Before you begin, gather the following materials and tools:
- Digital Cutting Machine (e.g., Silhouette or Cricut) – Optional but recommended for accuracy.
- Art Knife and Scissors – For those who prefer hand-cutting.
- Cardstock – Suggested weight is Encore Cardstock at 80 lb cover (216 gsm), which provides durability and rigidity.
- Glue or Double-Sided Tape – Essential for assembling the layers securely.
- Shadow Box Frame – Choose one that matches the size of your design (20.32×20.32 cm).
- LED Strips – Optional for adding a glowing effect if you're creating a light box.
Step-by-Step Assembly
Using the provided SVG files, follow these general steps to assemble your 3D shadow box:
- Download and select the appropriate file format based on your cutting method.
- Cut out each of the nine layers carefully. If using a machine, ensure the settings match the cardstock thickness.
- Assemble the layers by gluing them together in order. Begin from the backmost layer and work your way forward.
- Insert the assembled layers into a shadow box frame. Make sure they’re spaced evenly for optimal shadow effects.
- If desired, add LED strips between the layers to create a soft glow. Secure them gently without damaging the delicate paper structures.
This process not only tests your attention to detail but also encourages patience and precision—skills that are valuable in both crafting and everyday life.
Why Choose the Saxophone Design?
The saxophone is more than just a musical instrument; it symbolizes artistry, elegance, and passion. By incorporating this iconic shape into a 3D paper cut, you bring a touch of sophistication to any space. Here are a few reasons why this design stands out:
- Unique Aesthetic: The layered structure gives the saxophone a lifelike presence that flat designs cannot replicate.
- Customization Potential: With the right tools, you can experiment with colors, finishes, and even backlighting to personalize your creation.
- Versatile Display Options: It can be framed as wall art or transformed into a light box, making it adaptable to different home décor styles.
- Perfect Gift Idea: Handmade gifts are always meaningful, and a custom saxophone shadow box adds a special touch for music lovers or creative friends.
Moreover, the saxophone's curved and flowing form presents a unique challenge for paper artists. Successfully replicating its silhouette across nine layers requires both technical skill and artistic flair, making it an excellent project for advancing your abilities in paper cutting.
The Role of Technology in Modern Crafting
In today’s world, technology has revolutionized the way we approach hobbies like paper cutting. Digital templates such as SVGs allow crafters to achieve results once reserved for professionals. These files are scalable, editable, and compatible with a wide range of tools—from basic scissors to advanced laser cutters.
With the rise of online marketplaces and downloadable content, accessing these templates has never been easier. Artists no longer need to spend hours sketching their own designs; instead, they can focus on the fun and creative aspects of assembly and presentation. This shift has democratized the craft, enabling people from diverse backgrounds to participate and innovate.
Common Misconceptions About 3D Paper Cuts
Despite their growing popularity, many misconceptions still surround 3D shadow box paper cuts. Let’s address a few of the most common ones:
- Misconception: It requires expensive equipment.
Reality: While digital cutting machines offer convenience, you can easily complete the project using an art knife and good-quality cardstock. - Misconception: Only experienced crafters can attempt it.
Reality: The layered nature of the design actually makes it beginner-friendly. Each step is manageable, especially with clear instructions and pre-made templates. - Misconception: It's time-consuming and impractical.
Reality: Once you get the hang of it, the process becomes faster and more intuitive. Plus, the end product is compact and easy to store or gift.
By understanding these points, new crafters can feel more confident in tackling a project like the Saxophone 3D Shadow Box.
Applications in Modern Life and Creativity
3D paper cuts have found their place in various modern contexts beyond just home décor:
- Interior Design: These pieces can serve as conversation starters in living rooms, offices, or studios.
- Education: Teachers can use them as hands-on learning tools to teach about art, music, or even engineering principles related to layering and spatial awareness.
- Business and Marketing: Custom-designed shadow boxes can be used as branded merchandise or promotional items for events, workshops, or retail stores.
- Gift-Giving: Personalized shadow boxes make thoughtful, handmade gifts for birthdays, holidays, or anniversaries.
Thanks to the flexibility of SVG templates, you can adapt the saxophone design for different themes or occasions. For instance, you might create a smaller version for a music-themed baby shower or incorporate metallic cardstock for a festive holiday display.
Enhancing Your Craft with Lighting
One of the most exciting features of the 3D shadow box is its compatibility with lighting. Adding LED strips between the layers transforms the static artwork into something dynamic and interactive. The gentle illumination highlights the contours of each layer, giving the saxophone a glowing, ethereal quality.
Here’s how to enhance your shadow box with light:
- Select thin, flexible LED strips that fit comfortably between the layers.
- Place the strips along the edges or behind key elements of the saxophone to accentuate the design.
- Secure the LEDs with adhesive backing or tape, ensuring they don’t interfere with the paper structure.
- Power the LEDs via a USB cable or battery pack, and enjoy your illuminated masterpiece!
This technique opens up endless possibilities for customization and innovation, allowing you to blend traditional crafts with modern tech in a seamless way.
Tips for Success
To help you get the best results from your Saxophone 3D Shadow Box, consider the following tips:
- Use Quality Materials: High GSM cardstock holds up better during cutting and maintains structural integrity when assembled.
- Work in Good Lighting: Whether cutting manually or using a machine, proper lighting helps avoid errors and improves accuracy.
- Take Breaks: Working on detailed layers for long periods can strain your eyes and hands. Step away occasionally to maintain focus and reduce fatigue.
- Experiment with Color: Don’t be afraid to try different color combinations. A monochrome set might look elegant, while a gradient could add visual interest.
- Test Before Finalizing: Before gluing everything together, test the alignment and spacing with temporary tape or clips to ensure everything fits perfectly.
Remember, every artist has their own style and pace. There's no “wrong” way to interpret the design—just let your creativity guide you!
Conclusion
The Saxophone 3D Shadow Box Paper Cut SVG is more than just a template—it’s a gateway to exploring the intersection of art, music, and modern technology. Whether you're looking to decorate your space, impress friends with a unique gift, or simply enjoy a rewarding DIY project, this design offers a perfect balance of complexity and accessibility.
As digital tools continue to evolve, so too does the potential for personal expression in crafts. With just a little guidance and the right materials, anyone can create something truly beautiful. So go ahead, download the template, grab your tools, and start crafting your own slice of musical magic.
Need more supplies? Explore our 12×12 Cardstock Shop to find the perfect materials for your next project. Happy crafting!